
Table of Contents
- Intro: My Journey to Perfect Gluten-Free No-Knead Bread
- How This Gluten-Free No-Knead Bread Recipe Works
- Ingredients and Substitutions for Your Best Loaf
- Step-by-Step Instructions: Baking Your Gluten-Free No-Knead Bread
- Expert Tips for Gluten-Free No-Knead Bread Success
- What to Serve With Your Freshly Baked Loaf
- Storing and Reheating Your Gluten-Free Bread
- Gluten-Free No-Knead Bread FAQ
Intro: My Journey to Perfect Gluten-Free No-Knead Bread
As a devoted home baker, few things bring me more joy than the aroma of freshly baked bread filling my kitchen. But for years, finding a truly great gluten free no knead bread recipe felt like chasing a mythical creature. So many attempts ended in dense, crumbly disappointments or loaves that barely rose. It was frustrating, especially when I knew many of you, like me, are busy home cooks simply wanting to enjoy delicious, homemade food without endless fuss. That’s why I poured my heart into perfecting this recipe. After countless experiments, tweaking ratios, and mastering techniques, I’m thrilled to share a recipe that is not only incredibly easy but delivers on taste and texture every single time. Imagine a loaf with an impossibly crisp, golden-brown crust, giving way to a soft, airy, and wonderfully chewy interior. This isn’t just good for gluten-free bread; it’s just plain *good* bread! And the best part? It requires minimal effort, making it ideal for those hectic weekdays or weekend mornings when you just want a fresh loaf with your coffee without all the active work. For more effortless culinary adventures, remember you can always See more easy recipes here.
How This Gluten-Free No-Knead Bread Recipe Works
This gluten free no knead bread isn’t magic, but it certainly feels like it! The secret lies in a few fundamental baking principles, perfectly adapted for gluten-free flours.
- Achieving a crispy crust and tender crumb: We leverage a high-hydration dough and bake it in a Dutch oven. The trapped steam in the initial baking phase creates that incredible, crackly crust, while the prolonged baking time ensures a fully cooked, tender crumb that doesn’t feel gummy or dry.
- The magic of long fermentation: This is where flavor truly develops! A slow, overnight rise at room temperature allows the yeast to work its wonders, breaking down starches and creating complex flavors that would normally come from extensive kneading. This also helps develop the structure in gluten-free doughs, which lack the gluten network of traditional bread.
- Simple ingredients, surprising results: You’ll notice that the ingredient list is quite humble. There are no fancy binders or obscure flours needed. Just a well-balanced gluten-free flour blend, yeast, salt, and water. The synergy of these simple components, combined with the no-knead method, yields a loaf that consistently surprises with its professional-bakery quality.
Ingredients and Substitutions for Your Best Loaf
Here is what you need and why:
Essential Gluten-Free Flour Blend: This is the backbone of your gluten free no knead bread. I highly recommend using a high-quality, pre-made all-purpose gluten-free flour blend that contains xanthan gum. Brands like King Arthur Gluten-Free All-Purpose Flour Blend or Bob’s Red Mill 1-to-1 Baking Flour work beautifully. The specific ratios of rice flour, tapioca starch, and other flours within these blends are crucial for achieving the right texture and rise without the need for additional binders. Avoid using single flours (like just rice flour) as they won’t provide the necessary structure and balance. If your blend doesn’t contain xanthan gum, add 1 teaspoon per 3 cups of flour.
Active Dry Yeast or Instant Yeast: Yeast is the leavening agent that makes our bread rise. For active dry yeast, you’ll want to activate it in warm water with a pinch of sugar first. If using instant yeast, you can mix it directly with the dry ingredients. King Arthur Baking has an excellent resource on understanding different types of yeast and how to use them effectively. I often prefer instant yeast for its convenience in no-knead recipes.
Fine Sea Salt: Salt is more than just a seasoning; it plays a vital role in controlling yeast activity and enhancing the flavor of your bread. It tempers the yeast’s fermentation, preventing the dough from over-rising too quickly and contributing to a stronger gluten-free structure. Use a fine-grained salt to ensure even distribution throughout the dough.
Warm Water: The temperature of your water is absolutely critical for activating the yeast. It should be between 105-115°F (40-46°C). Water that is too cold won’t activate the yeast, and water that is too hot will kill it. A kitchen thermometer is your best friend here. Proper hydration is also key for a tender gluten-free crumb.
Optional Additions for Flavor and Nutrition: Feel free to customize your gluten free no knead bread! Try adding 1/4 cup of seeds like sunflower, pumpkin, or flax for texture and nutrition. Dried herbs like rosemary or thyme (1-2 teaspoons) can add a lovely aroma and flavor. For a slightly sweet and savory loaf, a tablespoon of honey or maple syrup can be incorporated into the water.
Step-by-Step Instructions: Baking Your Gluten-Free No-Knead Bread
Follow these step-by-step instructions. The beauty of this gluten free no knead bread is its simplicity!
1. Mix the Dough (No Kneading Required!)
In a large bowl, whisk together your gluten-free flour blend, instant yeast (or activated active dry yeast), and salt. Pour in the warm water. Using a sturdy spatula or a wooden spoon, mix until all the flour is hydrated and you have a shaggy, very sticky dough. There should be no dry pockets of flour. Resist the urge to add more flour! This high hydration is key for a soft texture. Cover the bowl tightly with plastic wrap.
2. First Rise: Passive Proofing
Let the dough rest and rise at room temperature (about 68-72°F / 20-22°C) for 12-18 hours. This long, slow fermentation is where the magic happens, developing flavor and structure. The dough should roughly double in size and have small bubbles on the surface. If your kitchen is very warm, it might be ready sooner. If it’s cooler, it might take longer. Don’t rush this step!
3. Shaping the Dough
Generously flour your work surface and your hands with gluten-free flour. Gently scrape the dough out of the bowl onto the floured surface. It will be sticky and loose. Using floured hands, gently fold the edges of the dough towards the center a few times to create a somewhat round, taut ball. Don’t press too hard or deflate it completely. Place the shaped dough seam-side down onto a piece of parchment paper, dusting the top lightly with more flour.
4. Second Rise: Preparing for the Oven
Cover the dough loosely with plastic wrap or a clean kitchen towel. Let it rest for another 30-60 minutes while you preheat your oven and Dutch oven. This short second rise allows the dough to relax and prepare for its final magnificent rise in the oven.
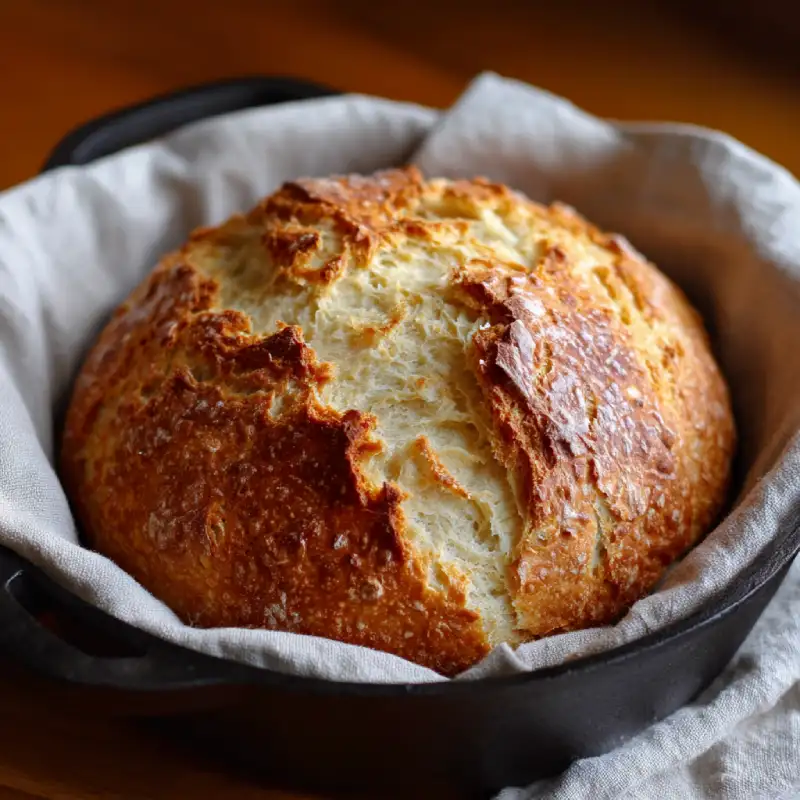
5. Baking Technique: Dutch Oven for Superior Crust
Place your 5-6 quart Dutch oven (with its lid) into your oven and preheat to 450°F (230°C) for at least 30 minutes. This ensures the Dutch oven is screaming hot. Carefully remove the hot Dutch oven. Using the parchment paper as a sling, gently lower the dough into the blazing hot pot. Place the lid back on and return to the oven. Bake for 30 minutes with the lid on, trapping the steam. Then, remove the lid and continue baking for another 15-20 minutes, or until the crust is deeply golden brown and sounds hollow when tapped.
6. Cooling: The Crucial Final Step
This is arguably the most important step for gluten-free bread! Immediately transfer the baked loaf to a wire rack. Let it cool COMPLETELY for at least 2-3 hours (or even longer) before slicing. Slicing too early will result in a gummy texture because the internal starches are still setting. Patience is a virtue here, I promise!
Expert Tips for Gluten-Free No-Knead Bread Success
- Flour Blend Recommendations and Tips: Stick to reputable gluten-free all-purpose flour blends that include xanthan gum for the best results in your gluten free no knead bread. Measuring your flour by weight (grams) rather than volume (cups) is far more accurate and will lead to consistent results. A digital kitchen scale is a baker’s best friend!
- Troubleshooting Sticky Dough: Gluten-free doughs are inherently stickier than wheat-based doughs. Don’t be alarmed! Generous flouring of your work surface and hands when shaping is key. A bench scraper can also be invaluable for handling and moving the sticky dough.
- Achieving the Perfect Crust: The preheated Dutch oven technique is non-negotiable for that amazing crunchy crust. If you don’t have a Dutch oven, you can try placing a pan of hot water on the bottom rack of your oven to create steam, but the Dutch oven method is superior.
- Don’t Rush the Cooling Process: I cannot stress this enough for gluten-free bread. The internal structure truly sets as it cools. Slicing too early will release steam too quickly, leading to a doughy, gummy interior. Trust the process and let it cool completely!
- Adjusting Fermentation Time: Pay attention to your dough, not just the clock. If your kitchen is warm, the first rise might be shorter. If it’s cool, it might take longer. Look for visual cues like doubling in size and surface bubbles.
What to Serve With Your Freshly Baked Loaf
Your magnificent gluten free no knead bread deserves to be enjoyed! Here are some ideas:
- Soup and Stews: There’s nothing quite like a thick slice of hearty bread to sop up every last drop of a comforting homemade soup or stew. Think classic tomato soup, a rich beef stew, or a creamy lentil soup.
- Sandwiches and Toast: Slice it thick for a satisfying sandwich filled with your favorite deli meats and cheeses, or simply toast it and slather with butter and jam for a delightful breakfast. Avocado toast gets an immediate upgrade with this bread!
- Cheese Boards and Spreads: The rustic texture and subtle flavor of this bread make it perfect for pairing with a selection of cheeses, charcuterie, and homemade dips like hummus, olive tapenade, or a roasted red pepper spread.
Storing and Reheating Your Gluten-Free Bread
Once cooled, a well-made gluten free no knead bread can last a few days if stored properly.
- Countertop Storage for Short-Term: Wrap your cooled loaf tightly in plastic wrap or store it in an airtight bread bag at room temperature for up to 2-3 days. This helps maintain its moisture and prevents it from drying out.
- Freezing for Longer Preservation: For longer storage, slice the cooled bread and freeze it in an airtight freezer bag for up to 3 months. This is wonderful for having fresh bread on demand!
- Best Way to Reheat for Freshness: To revive a refrigerated or frozen slice, a quick toast in a toaster oven or even a few minutes in a conventional oven (at about 350°F / 175°C) will bring back that lovely crispness. Whole loaves can be re-warmed by wrapping them in foil and heating in a 300°F (150°C) oven for about 15-20 minutes.
Gluten-Free No-Knead Bread FAQ
Can I use a different gluten-free flour for this gluten free no knead bread recipe?
How long does the dough need to rise for this gluten free no knead bread?
My gluten free no knead bread is too dense, what went wrong?
Can I add sourdough starter to this gluten free no knead bread recipe?
Delicious Gluten Free No Knead Bread
- Total Time: 31 minute
- Yield: 1 large loaf (8-10 servings)
Description
Unlock the secret to bakery-quality gluten-free bread at home with this incredibly easy no-knead method. Enjoy a perfectly crispy crust and a tender, airy crumb with minimal effort.
Ingredients
- 3 cups (360g) Gluten-Free All-Purpose Flour Blend (with xanthan gum)
- 1 tsp Instant Yeast (or Active Dry Yeast)
- 1 tsp Fine Sea Salt
- 1 ½ cups (360ml) Warm Water (105-115°F / 40-46°C)
- Optional: ¼ cup seeds (sunflower, pumpkin) or 1-2 tsp dried herbs
Instructions
- In a large bowl, combine flour, yeast, and salt. Add warm water and mix with a spatula until a shaggy, sticky dough forms with no dry spots. Cover tightly with plastic wrap.
- Let the dough rise at room temperature for 12-18 hours, or until doubled in size and bubbly.
- Generously flour your work surface and hands. Gently scrape dough onto surface and shape into a rustic ball by folding edges towards the center. Place on parchment paper, seam-side down.
- Cover loosely and let rise for another 30-60 minutes while preheating oven and Dutch oven to 450°F (230°C) for 30 minutes.
- Carefully place dough in hot Dutch oven (using parchment as a sling). Cover and bake for 30 minutes.
- Remove lid and bake for another 15-20 minutes, until deeply golden brown.
- Transfer to a wire rack and cool completely (at least 2-3 hours) before slicing to prevent gumminess. Enjoy your homemade gluten free no knead bread!
- Prep Time: 15 mins
- Cook Time: 45-50 mins