
Table of Contents
- Introduction: Your New Go-To Gluten-Free Sweet and Sour Meal
- Why This Recipe Works
- Ingredients and Smart Substitutions for Our Gluten-Free Sweet and Sour
- How to Make Your New Go-To Gluten-Free Sweet and Sour Meal
- Expert Tips for Sweet and Sour Success
- Storing and Reheating Your Sweet and Sour
- What to Serve With Your Gluten-Free Sweet and Sour
- Frequently Asked Questions
Introduction: Your New Go-To Gluten-Free Sweet and Sour Meal
Oh, the glorious dance of sweet, sour, and savory – a culinary ballet that captivates taste buds worldwide! But for those of us navigating the world of gluten-free eating, achieving that perfect, crispy, yet succulent sweet and sour dish can feel like an elusive dream. Fear not, fellow food lovers, because today we’re diving headfirst into a recipe that will not only satisfy those cravings but will become your new go-to. Imagine biting into tender, perfectly coated protein, enveloped in a vibrant, glossy sauce that truly sings with balanced flavors. This isn’t just a gluten-free sweet and sour recipe; it’s a revelation! And if you’re looking for more amazing recipes to simplify your weeknights, See more easy recipes and prepare to be inspired!
Why This Recipe Is a Must-Try for Busy Home Cooks
Life moves fast, and often, delicious, homemade meals get relegated to special occasions. But this sweet and sour gluten free recipe is designed to defy that norm. It’s surprisingly quick to assemble, uses readily available ingredients, and promises a flavor payoff that far exceeds the effort. You’ll be amazed at how easily you can bring restaurant-quality taste right to your kitchen table on even the busiest of weeknights.
My Journey to Perfecting This Gluten-Free Sweet and Sour
As a passionate home baker and cook, I’ve had my share of sweet and sour experiments, particularly after going gluten-free. Early attempts often resulted in sauces that were either too syrupy or too bland, and the protein never quite achieved that satisfying outer crispness. After countless iterations, playing with proportions, and testing various gluten-free flours and thickening agents, I finally landed on this golden recipe. It strikes that delicate balance, ensuring every bite is a harmonious blend of textures and tastes, without any of the gluten!
Why This Recipe Works
- Achieving the Perfect Balance of Sweet, Sour, and Savory: This recipe meticulously balances the tang of vinegar, the sweetness of sugar, and the umami of soy sauce (or tamari) with a hint of garlic and ginger for a complex, addictive flavor profile.
- The Secret to Crispy, Yet Tender, Gluten-Free Elements: We use a specific gluten-free coating technique and cooking method that locks in moisture while creating an irresistibly crispy exterior on your protein, ensuring it stands up beautifully to the luscious sauce.
- Comes Together Faster Than Takeout: With a little prep, you’ll find this dish on your table quicker than waiting for a delivery, making it the ultimate healthy and delicious alternative.
- Versatile and Customizable: This recipe serves as a fantastic base, allowing you to easily swap proteins and vegetables to suit your preferences or what you have on hand.
Ingredients and Smart Substitutions for Our Gluten-Free Sweet and Sour
Here is what you need and why:
The Essential Gluten-Free Protein Choices (Chicken, Pork, Tofu): For this sweet and sour gluten free dish, I often opt for boneless, skinless chicken thighs or breasts cut into 1-inch pieces. Pork loin or tenderloin works beautifully too, offering a slightly richer flavor. For a vegetarian or vegan option, firm or extra-firm tofu, pressed and cubed, is an excellent substitute, absorbing the flavors wonderfully. You could even use shrimp for a quick-cooking alternative.
Crafting the Dynamic Sweet and Sour Sauce (Why Each Ingredient Matters): This sauce is the star! We’re talking quality ingredients here. Ketchup provides body and a baseline sweetness. Rice vinegar is crucial for that characteristic tang; avoid white vinegar as it’s too harsh. Brown sugar or maple syrup adds depth and sweetness. Gluten-free tamari or coconut aminos deliver salty umami without the gluten. Don’t forget fresh garlic and ginger, which are non-negotiable for aromatic complexity. A touch of pineapple juice (from canned pineapple rings, which we’ll also use) balances the acidity and adds a subtle fruity note.
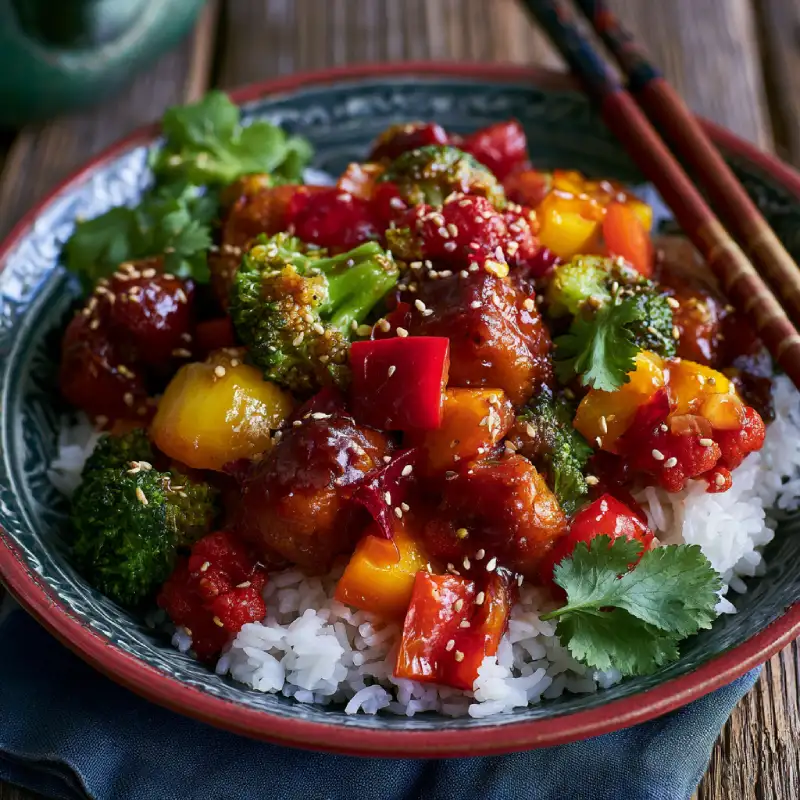
Vegetable Power-Ups and What You Can Swap: My go-to is a colorful mix of bell peppers (red, green, yellow for visual appeal and sweetness), onions, and canned pineapple chunks. Other fantastic additions include snap peas, carrots (sliced thinly), broccoli florets, or even water chestnuts for added crunch. Feel free to use whatever fresh vegetables you enjoy and have accessible.
Gluten-Free Thickening Agents: Cornstarch vs. Arrowroot: Both work effectively for gluten-free thickening. Cornstarch is my preference for its clear finish and consistent thickening power. Arrowroot powder is a great alternative, especially if you want to avoid corn; it thickens similarly but can sometimes be a bit more delicate, so add cautiously. A 1:1 substitution usually works, but always mix with cold water first to create a slurry before adding to the hot sauce.
How to Make Your New Go-To Gluten-Free Sweet and Sour Meal
Follow these step-by-step instructions to create a truly unforgettable sweet and sour gluten free masterpiece:
1. Prep Like a Pro: Marinating and Chopping
Protein: If using chicken or pork, cut into uniform 1-inch pieces. For tofu, press out excess water, then cube. Marinate your protein for at least 30 minutes (or up to overnight) in a mixture of 1 tablespoon gluten-free tamari and 1 teaspoon grated ginger. This infuses flavor and tenderizes. While that marinates, chop all your vegetables – bell peppers, onions, and any others – into similar bite-sized pieces. Drain your pineapple chunks.
2. Cooking Your Protein to Perfection
In a medium bowl, dredge your marinated protein in about 1/4 cup of cornstarch (or arrowroot), ensuring each piece is lightly coated. Heat 1-2 tablespoons of high-heat oil (like avocado or grapeseed) in a large skillet or wok over medium-high heat. Working in batches if necessary (to avoid overcrowding!), add the protein and cook until golden brown and cooked through, about 5-7 minutes per batch. Remove and set aside. This step creates that desirable crispy texture.
3. Assembling the Vibrant Vegetable Medley
In the same skillet (add a little more oil if needed), sauté your chopped onions for 2-3 minutes until they start to soften. Add the bell peppers and any other firm vegetables (like carrots) and cook for another 3-4 minutes until they are vibrant and slightly tender-crisp. You want them to retain a little bite, not become mushy.
4. The Art of the Sweet and Sour Sauce: Simmer and Thicken
While the vegetables cook, whisk together all the sauce ingredients in a small bowl: ketchup, rice vinegar, brown sugar, gluten-free tamari, pineapple juice, minced garlic, and grated ginger. Pour this glorious mixture over the sautéed vegetables. Bring to a gentle simmer. In a separate small bowl, whisk 1 tablespoon of cornstarch with 2 tablespoons of cold water to create a slurry. Gradually whisk this slurry into the simmering sauce. Continue to stir until the sauce thickens and becomes glossy, about 1-2 minutes. Reduce heat to low. This is where the magic happens!
5. Bringing It All Together: The Final Toss
Return your cooked, crispy protein to the skillet with the now-thickened sauce and vegetables. Add the pineapple chunks. Toss gently to coat everything evenly in that glistening, flavorful sauce. Cook for just another minute or two, allowing the flavors to meld and the protein to warm through. Serve immediately, garnished with sesame seeds or chopped green onions if desired.
Expert Tips for Sweet and Sour Success
- Don’t Overcrowd the Pan: Achieving Maximum Crispiness: When cooking your protein, resist the urge to cram too many pieces into the skillet. Cooking in batches ensures each piece gets adequate heat and space to brown and crisp up, rather than steaming. This is critical for texture!
- Taste and Adjust: Sauce Perfection is Key: Before adding the thickening slurry, taste your sweet and sour sauce. Does it need more sweetness? A bit more tang? Adjust the brown sugar or rice vinegar to your liking. A truly balanced sauce lifts the entire dish.
- Batch Cooking for Easy Weeknight Meals: This recipe is fantastic for meal prepping! Cook a double batch of protein and sauce, then combine portions as needed throughout the week. It reheats beautifully, making healthy dinners a breeze.
- Quality of Ingredients Matters: Use good quality gluten-free tamari and fresh garlic and ginger. The better the raw ingredients, the more vibrant and delicious your final dish will be.
- External Link Bonus: For even more tips on achieving gluten-free perfection in Asian-inspired dishes, check out this great resource on Food Network’s gluten-free cooking tips.
Storing and Reheating Your Sweet and Sour
Safe Storage Practices for Leftovers: Leftovers of this delicious sweet and sour gluten free dish can be stored in an airtight container in the refrigerator for up to 3-4 days. Allow the dish to cool completely before transferring to storage containers to prevent condensation and maintain freshness.
The Best Way to Reheat Without Losing Flavor or Texture: For best results, reheat your sweet and sour in a skillet over medium heat, stirring occasionally, until warmed through. This helps to re-crisp the vegetables and protein slightly. You can also microwave, but the texture might be a bit softer. If the sauce has thickened too much upon reheating, add a tablespoon or two of water or chicken broth to thin it back to your desired consistency.
What to Serve With Your Gluten-Free Sweet and Sour
- Fluffy White Rice or Brown Rice: The classic pairing! The simple rice perfectly soaks up the glorious sweet and sour sauce.
- Cauliflower Rice for a Low-Carb Option: If you’re watching your carb intake, cauliflower rice is an excellent, light alternative that still provides a great base for the sauce.
- Steamed Broccoli or Asparagus: For an extra boost of greens, serve alongside simply steamed broccoli florets or asparagus spears. Their fresh, slightly bitter notes offer a wonderful contrast to the sweet and sour flavors.
- Gluten-Free Noodles: Transform it into a stir-fry by serving over gluten-free rice noodles or shirataki noodles.
Frequently Asked Questions
Can I make this vegetarian or vegan?
What if my sauce is too thin/thick?
How can I make this spicier?
Is this suitable for meal prepping?
Gluten-Free Sweet and Sour Meal
- Total Time: 45 minutes
- Yield: 4 servings
Description
A vibrant and flavorful gluten-free sweet and sour dish, boasting crispy protein and tender vegetables coated in a perfectly balanced sauce. Enjoy this quick and easy take-out inspired meal right at home.
Ingredients
- 1 lb boneless, skinless chicken thighs or breasts (or pork tenderloin/extra-firm tofu), cut into 1-inch pieces
- 1 tbsp gluten-free tamari (for marinade)
- 1 tsp grated fresh ginger (for marinade)
- 1/4 cup cornstarch (for dredging)
- 2–3 tbsp high-heat oil (avocado, grapeseed)
- 1 cup chopped onion (about 1 medium)
- 2 bell peppers (any color), chopped
- 1 (8 oz) can pineapple chunks, drained (reserve juice for sauce)
- For the Sweet and Sour Sauce:
- 1/2 cup ketchup
- 1/4 cup rice vinegar
- 1/4 cup brown sugar (packed)
- 2 tbsp gluten-free tamari
- 1/4 cup reserved pineapple juice
- 2 cloves garlic, minced
- 1 tsp grated fresh ginger
- 1 tbsp cornstarch (for slurry)
- 2 tbsp cold water (for slurry)
- Optional Garnish: Sesame seeds, chopped green onions
Instructions
- 1. Prep Protein & Veggies: Cut protein into 1-inch pieces. Marinate with 1 tbsp tamari and 1 tsp grated ginger for 30 mins. Chop onions and bell peppers. Reserve pineapple juice.
- 2. Cook Protein: Dredge marinated protein in 1/4 cup cornstarch. Heat 1-2 tbsp oil in a large skillet over medium-high heat. Cook protein in batches until golden brown and cooked through, 5-7 mins. Set aside.
- 3. Sauté Veggies: In the same skillet, sauté onions for 2-3 mins. Add bell peppers and cook for 3-4 mins until tender-crisp.
- 4. Make Sauce: Whisk ketchup, rice vinegar, brown sugar, 2 tbsp tamari, pineapple juice, minced garlic, and grated ginger. Pour over sautéed veggies and bring to a simmer.
- 5. Thicken Sauce: Whisk 1 tbsp cornstarch with 2 tbsp cold water to make a slurry. Slowly whisk into simmering sauce until thickened and glossy, 1-2 mins. Reduce heat.
- 6. Combine & Serve: Return cooked protein and drained pineapple chunks to the skillet. Toss to coat evenly. Cook for 1-2 mins to heat through. Garnish as desired and serve immediately with rice or your preferred side.
- Prep Time: 20 mins
- Cook Time: 25 mins