
Table of Contents
- Make Your Own Watermelon Candy Sour: A Flavorful Adventure
- How This Watermelon Candy Sour Recipe Works
- Essential Ingredients & Smart Substitutions for Watermelon Candy Sour
- Step-by-Step Instructions: Crafting Perfect Watermelon Candy Sour
- Expert Tips for Watermelon Candy Sour Success
- What to Serve With Your Watermelon Candy Sour
- Storing and Reheating Your Watermelon Candy Sour
- Watermelon Candy Sour: Frequently Asked Questions
Make Your Own Watermelon Candy Sour: A Flavorful Adventure
Are you ready to embark on a taste adventure that perfectly balances the sweet juiciness of summer with an exhilarating puckering sour kick? My friends, prepare yourselves for the ultimate homemade watermelon candy sour! Imagine biting into a chewy, vibrant treat that immediately transports you to sun-drenched days, followed by a glorious explosion of tangy delight. This isn’t just candy; it’s an experience, a memory in the making, and absolute proof that homemade treats are always superior. If you love to explore new and exciting culinary projects, you’ll find plenty more inspiration when you See more easy recipes on my blog!
Why This Watermelon Candy Sour Recipe Will Be Your New Favorite
This isn’t just any candy recipe; it’s *the* watermelon candy sour recipe you’ve been searching for. It delivers on every promise:
- Unbeatable Flavor Authenticity: We’re talking real watermelon taste, not just a generic fruity note.
- Perfect Texture Every Time: Chewy, tender, and never too hard or overly soft – exactly what you want from a gummy candy.
- Customizable Sour Power: Whether you prefer a gentle tang or a mouth-watering pucker, you’re in control.
- Impressively Easy to Master: With clear, detailed steps, even novice candy makers will achieve stellar results.
How This Watermelon Candy Sour Recipe Works
Creating the perfect watermelon candy sour is a delightful dance of science and artistry. Let’s break down the magic behind these irresistible treats.
Achieving the Perfect Balance of Sweet and Tart
The secret to a truly great sour candy lies in a finely tuned sweet-to-tart ratio. We’re using granulated sugar for sweetness and a dynamic duo of citric and malic acid to bring the sour. Citric acid provides an immediate, bright tang, while malic acid offers a lingering, fruitier sourness, much like what you find in green apples or, indeed, watermelon’s natural tart notes. This combination ensures a multi-layered sour experience that electrifies the palate without overwhelming it.
The Role of Gelatin for Perfect Chewiness
Gelatin is the true star here, responsible for that signature chewy, bouncy texture of our watermelon candy sour. When bloomed correctly and then dissolved, it creates a stable, elastic matrix that holds the candy together. We’ll be using specific types and quantities to ensure your candies are perfectly tender and resilient, not rubbery or brittle.
Infusing Authentic Watermelon Flavor
To capture that genuine, juicy watermelon essence, we rely on high-quality flavoring. The method of adding it at the right temperature is crucial to ensure the delicate aromatic compounds aren’t cooked away, leaving you with a vibrant, true-to-fruit taste in every bite of your watermelon candy sour.
Essential Ingredients & Smart Substitutions for Watermelon Candy Sour
Here is what you need and why:
Gelatin: Why Quality Matters for Texture: For our watermelon candy sour, unflavored gelatin is non-negotiable. I recommend a high-quality brand like Knox or a similar artisanal leaf gelatin. The quality directly impacts the candy’s chewiness and set. Don’t skimp here; a good bloom translates to a perfect chew. While some recipes use flavored gelatin, I find it harder to control the true watermelon flavor, and the texture can sometimes be off.
Watermelon Flavoring: Extract vs. Emulsion: This is where the magic happens for your watermelon candy sour! A good quality watermelon extract will give a clean, bright flavor. However, I often lean towards watermelon emulsions. Emulsions are water-based and typically have a more robust, longer-lasting flavor that stands up better to heat, meaning a more intense watermelon punch in your final candy. Brands like LorAnn Oils are excellent for this.
Citric Acid & Malic Acid: The Secret to Sour Power: These are your sour superstars for the watermelon candy sour! Citric acid provides that immediate, sharp, tangy hit, much like lemon juice. Malic acid, found naturally in fruits like apples and, yes, watermelon, gives a longer-lasting, smoother, and fruitier sourness. Using both creates a complex, perfectly balanced sour profile. You can find these powdered acids in specialty baking stores or online. For a milder sour, you can just use citric acid.
Sweeteners: Granulated Sugar vs. Alternatives: Classic granulated sugar provides the bulk of the sweetness and structure for our watermelon candy sour. It dissolves beautifully, creating a clear candy base. While you *could* experiment with alternative sweeteners like xylitol or erythritol for a lower-sugar version, be aware that the texture and set might vary significantly, as sugar plays a crucial role in the candy’s body and crystallization. For a traditional gummy, stick with granulated sugar.
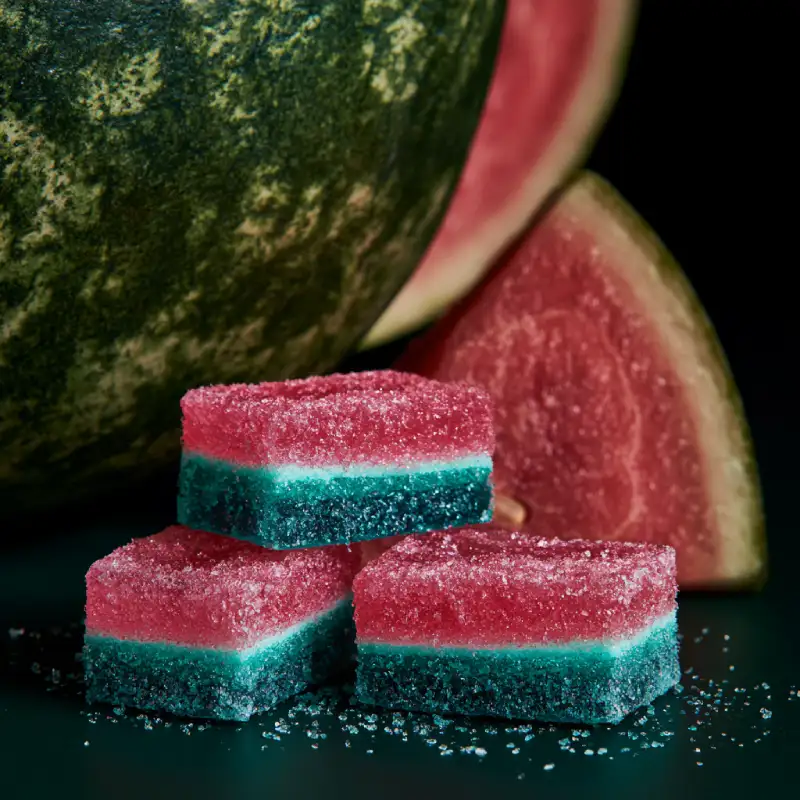
Food Coloring: For That Signature Watermelon Look: A touch of red or pink food coloring is essential to give your watermelon candy sour its recognizable hue. Gel food coloring is highly concentrated and preferred over liquid drops, as it won’t dilute your candy base. Start with a tiny drop and build up to your desired vibrant shade. You can even add a tiny speck of green for a dual-toned effect if you’re feeling fancy!
Step-by-Step Instructions: Crafting Perfect Watermelon Candy Sour
Follow these step-by-step photos:
1. Prepping Your Molds and Work Surface
Before you begin, lightly grease your silicone candy molds or a glass baking dish (8×8 inch works well for slicing) with a neutral oil like grapeseed or coconut oil. Wipe away any excess. This ensures your watermelon candy sour will release easily. Line a baking sheet with parchment paper for placing your cut candies.
2. Blooming the Gelatin: The Foundation
In a small bowl, sprinkle the unflavored gelatin evenly over 1/2 cup of cold water. Do not stir it immediately; let it sit undisturbed for about 5-10 minutes. The gelatin will absorb the water and swell, creating a thick, jelly-like mass. This crucial step, called “blooming,” ensures a smooth, lump-free candy base for your watermelon candy sour.
3. Combining Ingredients for the Candy Base
In a medium saucepan, combine 1 cup granulated sugar, 1/4 cup corn syrup (this helps prevent crystallization and adds chewiness), and 1/2 cup water. Stir gently until the sugar is moistened. Attach a candy thermometer to the side of the pan, making sure it doesn’t touch the bottom.
4. Heating and Stirring for Clarity
Place the saucepan over medium heat. Stir occasionally until the sugar completely dissolves and the mixture comes to a boil. Continue to cook, without stirring, until the thermometer reads 250°F (121°C). This hard ball stage is key for the candy’s eventual firmness. Once it reaches temperature, immediately remove from heat.
5. Adding Flavor and Color
Quickly stir in the bloomed gelatin into the hot sugar mixture. Stir until it is completely dissolved and no lumps remain. Then, add a few drops of watermelon emulsion or extract and a small amount of red or pink gel food coloring. Stir well to incorporate evenly. Be mindful not to add too much at once; you can always add more color if needed to get that perfect watermelon shade for your watermelon candy sour.
6. Pouring and Setting the Candy
Carefully pour the hot candy mixture into your prepared molds or baking dish. If using a dish, ensure the layer is even, about 1/2 inch thick. Let the candy sit undisturbed at room temperature for at least 4-6 hours, or ideally overnight, until fully set and firm. You can also refrigerate it after it cools slightly to speed up the process, but room temperature often yields a better texture for watermelon candy sour.
7. Cutting and Coating for the Sour Finish
Once fully set, carefully remove the candy from the molds or invert the baking dish onto a cutting board. If using a dish, cut the slab into desired shapes (squares, rectangles, or use small cookie cutters). In a shallow bowl, combine 1/4 cup granulated sugar with 1-2 teaspoons each of citric acid and malic acid (adjust to your sour preference). Toss each piece of watermelon candy sour in this sour dust until evenly coated. Shake off any excess.
Expert Tips for Watermelon Candy Sour Success
- Temperature Control for Optimal Set: A reliable candy thermometer is your best friend here. Reaching the precise 250°F (121°C) is crucial for the perfect chew and set. Deviating too much can result in candy that’s too soft or too hard.
- Avoiding Stickiness: The Right Coating Strategy: The sour sugar coating is not just for flavor; it also prevents your watermelon candy sour from sticking together. Ensure candies are completely dry on the surface before coating. If they feel tacky, let them air dry for a bit longer.
- Enhancing Sourness: Layering Acids: For an extra sour kick, you can add a tiny pinch of citric or malic acid directly into the mixture *after* it’s been removed from the heat and slightly cooled, just before adding flavor. This preserves some of the acid’s raw intensity.
- Troubleshooting Common Candy Making Issues: If your candy doesn’t set, it likely didn’t reach a high enough temperature, or your gelatin wasn’t fully bloomed. If it’s grainy, the sugar may have crystallized; ensure all sugar is dissolved before boiling. If it’s too sticky, increase your sour sugar coating or let it dry longer.
- Cleanliness is Key: Scrape down the sides of your saucepan often while heating to prevent sugar crystals from forming on the sides and dropping back into your candy, which can cause graininess. For more candy making advice, check out King Arthur Baking’s guide to gummy candy.
What to Serve With Your Watermelon Candy Sour
These vibrant watermelon candy sour treats are incredibly versatile!
Perfect for Parties and Gatherings
Brighten up any dessert table or candy buffet with a colorful bowl of these candies. Kids and adults alike will be drawn to their inviting hue and irresistible sour-sweet flavor. They make fantastic conversation starters!
Gift-Giving Ideas
Package your homemade watermelon candy sour in pretty cellophane bags tied with a ribbon for a thoughtful and delicious edible gift. Perfect for birthdays, hostess gifts, or just a little pick-me-up for friends and family.
Refreshing Summer Treats
Since they capture the essence of watermelon, these candies are naturally refreshing! Serve them chilled from the fridge on a hot day for an extra invigorating sensation. They pair wonderfully with a tall glass of iced tea or lemonade.
Storing and Reheating Your Watermelon Candy Sour
Keeping Candy Fresh: Best Practices
To keep your watermelon candy sour fresh and chewy, store them in an airtight container at cool room temperature (below 75°F/24°C). Layer them between sheets of parchment paper if you have many to prevent sticking. They will last for up to 2-3 weeks, though I doubt they’ll stick around that long!
Preventing Melting and Sticking
Humidity is the enemy of gummy candies. Ensure your storage container is well-sealed. If your candies feel a bit sticky over time, you can re-toss them in a small amount of fresh sour sugar coating.
Long-Term Storage Options
While often eaten fresh, watermelon candy sour can be frozen for up to 2 months. Place coated candies in a single layer on a parchment-lined tray and freeze until solid, then transfer to an airtight freezer-safe bag or container. Thaw at room temperature when ready to enjoy. They might lose a tiny bit of their original chewiness after freezing but will still be delightful.
Watermelon Candy Sour: Frequently Asked Questions
Can I use fresh watermelon juice?
How can I make the candy more or less sour?
What if my candy doesn’t set?
Is this recipe gluten-free/vegan?
Watermelon Candy Sour
- Total Time: 30 minutes
- Yield: Approx. 60-70 candies (depending on mold size)
Description
Unlock the ultimate sweet and tangy experience with this homemade watermelon candy sour recipe. Easy to follow, bursting with authentic fruit flavor, and featuring a delightful chewy texture.
Ingredients
- 1 cup granulated sugar (for candy)
- 1/4 cup corn syrup
- 1/2 cup cold water (for candy base)
- 4 packets (1 ounce total) unflavored gelatin
- 1/2 cup cold water (for blooming gelatin)
- 1–2 tsp watermelon emulsion or extract
- Few drops red/pink gel food coloring
- 1/4 cup granulated sugar (for coating)
- 1–2 tsp citric acid (for coating)
- 1–2 tsp malic acid (for coating)
- Neutral oil (for greasing molds)
Instructions
- Prep Molds: Lightly grease silicone molds or an 8×8 inch baking dish with neutral oil. Line a baking sheet with parchment paper.
- Bloom Gelatin: In a small bowl, sprinkle gelatin over 1/2 cup cold water. Let sit undisturbed for 5-10 minutes until swollen.
- Combine Candy Base: In a medium saucepan, combine 1 cup sugar, corn syrup, and 1/2 cup water. Stir gently. Attach a candy thermometer.
- Boil Mixture: Cook over medium heat, stirring occasionally until sugar dissolves. Boil without stirring until thermometer reads 250°F (121°C). Remove from heat immediately.
- Add Flavor & Color: Stir in bloomed gelatin until dissolved. Add watermelon flavoring and food coloring; stir well.
- Pour & Set: Carefully pour mixture into prepared molds or baking dish. Let set at room temperature for 4-6 hours or overnight.
- Coat Candies: Once set, remove from molds or cut into shapes. In a shallow bowl, combine 1/4 cup sugar, citric acid, and malic acid. Toss each candy piece in the sour coating until evenly covered. Shake off excess.
- Store: Store in an airtight container at room temperature.
- Prep Time: 20 minutes
- Cook Time: 10 minutes