
Table of Contents
- Discover the Magic of Apple Cider Vinegar Pickles
- How This Apple Cider Vinegar Pickle Recipe Works
- Ingredients: Your Essential Pickling Toolbox
- Step-by-Step: Crafting Your Apple Cider Vinegar Pickles
- Expert Tips for Success with ACV Pickles
- What to Serve With Your Homemade Apple Cider Vinegar Pickles
- Storing and Reheating Your Apple Cider Vinegar Pickles
- Apple Cider Vinegar Pickles: Your Questions Answered (FAQ)
There’s nothing quite like the satisfying crunch and vibrant tang of a perfectly pickled cucumber! If you’ve ever dreamed of transforming humble cucumbers into zesty, mouth-watering jars of goodness, then you’ve come to the right place. Today, we’re diving headfirst into the magical world of apple cider vinegar in pickles, a secret weapon that elevates your homemade brines to new heights. Prepare for a flavor explosion that’s both refreshing and utterly addictive. For more culinary adventures, See more good recipes here.
Discover the Magic of Apple Cider Vinegar Pickles
My Journey to Perfect ACV Pickles: For years, I experimented with various pickling vinegars, always chasing that elusive balance of sharp acidity and nuanced flavor. White vinegar offered crispness but lacked depth. Rice vinegar was too mild. Then, I discovered the game-changer: apple cider vinegar. Its subtle fruitiness and inherent complexity added a dimension to my pickles I never knew I was missing. It transformed my refrigerator from a mere storage unit into a pantry of pickled perfection, ready to be devoured at a moment’s notice.
Why Apple Cider Vinegar is Your Pickling Secret Weapon: Apple cider vinegar (ACV) brings so much more than just acidity to the party. Its naturally occurring malic acid contributes a pleasant tartness that’s less aggressive than white vinegar. This allows other flavors, like dill and garlic, to shine through beautifully, creating a more harmonious and well-rounded pickle. Plus, the slight residual sweetness inherent in good quality ACV helps balance the brine, making for a truly spectacular bite. Many enthusiasts even credit ACV with contributing to a firmer pickle, though the science is a bit more nuanced there; what’s undeniable is its superior flavor profile.
How This Apple Cider Vinegar Pickle Recipe Works
Crisp Texture Explained: The secret to crisp pickles, besides starting with fresh, firm cucumbers, lies in the carefully balanced brine and quick processing (or refrigeration). Our recipe incorporates a tried-and-true ratio of vinegar, water, and salt that helps draw out excess water from the cucumbers, preventing mushiness. The high acidity of the apple cider vinegar also plays a crucial role in maintaining firmness.
Flavor Profile: Tangy, Sweet, and Aromatic: This recipe delivers a pickle that’s a symphony of flavors. The prominent tang from the apple cider vinegar is beautifully mellowed by a touch of sugar, creating a delightful sweet-sour dynamic. Fresh dill and garlic infuse the brine with classic aromatic notes, while an array of spices adds layers of subtle warmth and complexity. It’s a pickle that truly awakens the palate.
Quick Pickling Method Breakdown: We’re focusing on a quick pickling method here, perfect for refrigerator pickles. This means no lengthy water bath canning is strictly required for immediate enjoyment (though we’ll cover that option too!). The process involves quickly bringing the brine to a boil, pouring it over packed cucumbers and aromatics, and then allowing them to cool and chill. The flavors meld rapidly, and you’ll have delicious pickles ready to eat in just a few days.
Ingredients: Your Essential Pickling Toolbox
Here is what you need and why:
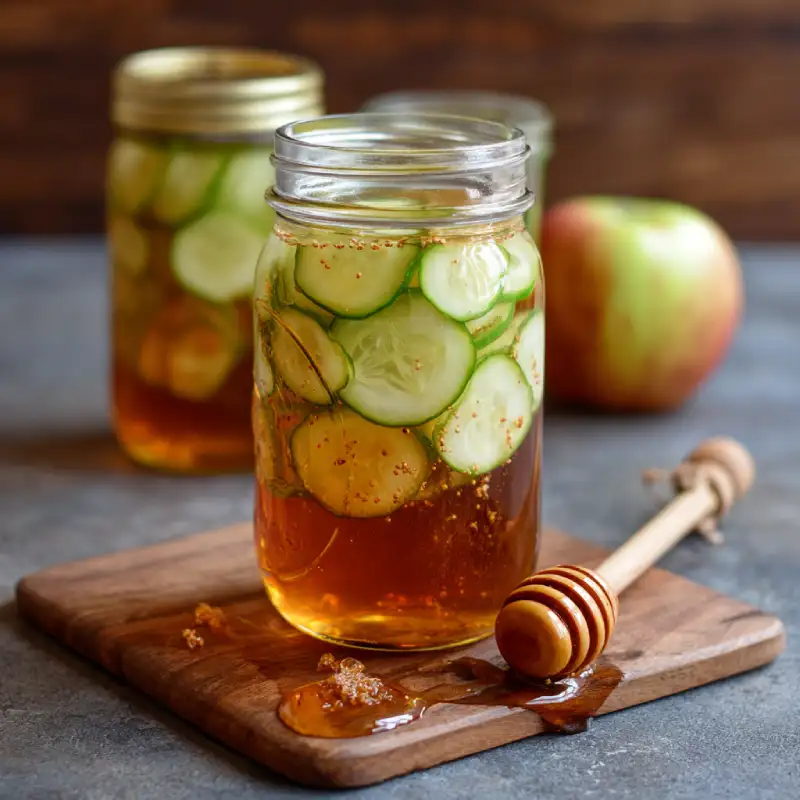
The Perfect Cucumber: Selection and Preparation: For the best pickles, choose pickling cucumbers (such as Kirby or Persian varieties) that are small to medium-sized, firm, and free of blemishes. Avoid large, watery slicing cucumbers as they tend to become mushy. Wash them thoroughly and trim off the blossom end (the end opposite the stem) as it contains enzymes that can lead to soft pickles. Slice them into spears, rounds, or leave them whole if they’re very small.
Apple Cider Vinegar: Not All ACV is Created Equal: Opt for an unpasteurized, organic apple cider vinegar ‘with the mother.’ While any ACV will work, the ‘mother’ contains beneficial bacteria and enzymes that can contribute to a more robust flavor profile, though its impact on the pickling process itself is often debated. It certainly gives a superior taste. Learn more about ACV on Food Network.
Salt: The Brine’s Foundation (Types & Functions): Use pickling salt (canning salt). It’s pure granulated salt without anti-caking agents or iodine, which can cloud the brine or affect pickle color. Salt is crucial for drawing out moisture from the cucumbers, inhibiting undesirable bacterial growth, and, of course, for flavor. Do not use table salt.
Sugar: Balancing Acidity and Flavor: Granulated sugar is a key ingredient to balance the sharp acidity of the vinegar. It doesn’t just add sweetness; it mellows the tang, creating a more palatable and complex brine. Adjust the amount to your personal preference for a sweeter or more tart pickle.
Garlic & Dill: Classic Flavor Enhancers: Fresh garlic cloves, crushed or sliced, and fresh dill (heads, sprigs, or chopped fronds) are the quintessential pickle aromatics. They infuse the brine with their unmistakable, savory, and herbaceous notes that define classic dill pickles.
Spices: Beyond the Basics (Mustard Seed, Peppercorns, etc.): Whole mustard seeds (yellow or brown), black peppercorns, coriander seeds, and dill seeds are fantastic additions that add subtle warmth and complexity. You can also experiment with red pepper flakes for a touch of heat, bay leaves, or even a small piece of dried chili.
Water: The Unsung Hero of Brine: Use filtered or distilled water when making your brine. Tap water, especially if it’s hard or chlorinated, can sometimes lead to discolored pickles or off-flavors. Pure water ensures your brine is clean and your flavors are true.
Step-by-Step: Crafting Your Apple Cider Vinegar Pickles
Follow these step-by-step instructions for perfect pickles every time:
1. Prep Your Cucumbers
Prepare your cucumbers: Wash your pickling cucumbers thoroughly under cold running water. Trim off both ends, especially the blossom end. Slice them into spears, rounds, or leave smaller ones whole, as desired. Pat them dry with a clean towel. For an extra crisp pickle, some prefer to soak cucumbers in an ice bath for 1-2 hours before slicing, or a salted water brine overnight, but for this quick method, it’s optional.
2. Sterilize Your Jars
Sterilize your jars and lids: This is crucial for safety and shelf life, especially if planning to can. Wash mason jars and lids in hot, soapy water. Rinse thoroughly. For canning, sterilize jars by submerging them in boiling water for at least 10 minutes. Keep them hot until ready to fill. If making refrigerator pickles, a thorough washing and rinsing is often sufficient, but sterilization doesn’t hurt.
3. Prepare Your Brine
Prepare your brine: In a non-reactive saucepan, combine the apple cider vinegar, filtered water, pickling salt, and sugar. Bring the mixture to a rolling boil over medium-high heat, stirring until the salt and sugar are completely dissolved. Once boiling, remove from heat. Taste and adjust sweetness or saltiness if desired. The brine should be pleasantly tangy and slightly salty.
4. Pack the Jars
Add aromatics and spices to jars, then pack cucumbers: Into each sterilized jar, add your desired aromatics: a few cloves of garlic, a sprig of fresh dill, and any whole spices like mustard seeds, peppercorns, and dill seeds. Then, pack the prepared cucumbers tightly into the jars, leaving about 1/2 inch of headspace from the rim. Packing them snugly prevents them from floating too much.
5. Pour Brine and Seal
Pour the brine: Carefully pour the hot brine over the packed cucumbers, ensuring they are completely submerged. Tap the jars gently on the counter to release any trapped air bubbles. If necessary, top off with more brine to maintain coverage. Wipe the rims of the jars clean with a damp cloth to ensure a good seal. Place the lids on the jars and screw on the bands until finger-tight.
6. Cool and Store
Cool and store: Allow the jars to cool completely to room temperature. Once cool, place them in the refrigerator. For best flavor, let them marinate for at least 2-3 days before enjoying. The longer they sit, the more the flavors will develop. If water bath canning, proceed with the canning steps below. Otherwise, these are now delicious refrigerator pickles!
Expert Tips for Success with ACV Pickles
- Choosing the Right Cucumbers for Pickling: Always opt for fresh, firm, small pickling cucumbers like Kirby or Persian varieties. Their thinner skins and dense flesh lead to superior crispness. Avoid large, seedy slicing cucumbers.
- Adjusting Brine Ratios for Taste Preference: This recipe offers a balanced brine, but don’t be afraid to customize! For a sweeter pickle, increase the sugar slightly. For a tangier pickle, reduce the water or increase the vinegar by a small amount. Always taste your brine before pouring.
- Preventing Mushy Pickles: Besides using the right cucumbers, trim the blossom end, ensure proper brine acidity, and avoid over-processing if canning. A grape leaf or a small amount of pickling crisping agent (like Pickle Crisp) added to each jar can also help maintain firmness.
- Flavor Variations and Add-Ins: Get creative! Try adding thinly sliced onions, jalapeños for heat, a pinch of turmeric for color and earthy flavor, whole dried chilis, or even fresh ginger slices. Star anise or cloves can provide a warming, unique twist.
- Understanding Shelf Life: Refrigerator vs. Canned Pickles: Refrigerator pickles, made with hot brine and not processed, last for about 2-3 months in the fridge. Canned pickles, properly processed in a water bath, can be shelf-stable for up to a year when stored in a cool, dark pantry.
What to Serve With Your Homemade Apple Cider Vinegar Pickles
Your homemade apple cider vinegar pickles are incredibly versatile and will elevate countless dishes:
- Sandwiches and Burgers: The Ultimate Topping: A slice or two of these tangy pickles instantly brightens up any sandwich, burger, or hot dog. Their sharp flavor cuts through richness beautifully.
- Salads and Bowls: A Zesty Crunch: Chop them up and add them to green salads, potato salad, tuna salad, or grain bowls for an unexpected burst of flavor and a delightful textural contrast.
- Charcuterie Boards: Elevating Your Spreads: Arrange your pickles alongside cheeses, cured meats, and crackers on a charcuterie board. Their acidity provides a perfect palate cleanser between richer bites.
- Beyond the Obvious: Creative Pairings: Try them alongside fried chicken, chop them into tartar sauce, or even serve them as a vibrant garnish for Bloody Marys. Don’t limit yourself – these pickles are excellent straight from the jar!
Storing and Reheating Your Apple Cider Vinegar Pickles
Proper storage ensures your pickles remain delicious and safe to eat.
- Refrigerator Pickles: Best Practices for Longevity: Once cooled, store your refrigerator pickles in the coldest part of your fridge. Ensure the cucumbers remain submerged in the brine. They will typically last for 2-3 months, but their crispness and flavor are best within the first few weeks.
- Canned Pickles: Proper Storage for Pantry Stability: If you’ve water bath canned your pickles, store them in a cool, dark, and dry pantry or cupboard. Away from direct sunlight and extreme temperature fluctuations. Properly sealed and stored, they can maintain quality for up to a year. Once opened, refrigerate and consume within a few weeks.
- Can You Reheat Pickles? (Spoiler: Not Recommended): Reheating pickles is generally not recommended. The heat will invariably soften the cucumbers, turning your crisp pickles into mushy ones. Pickles are best enjoyed cold or at room temperature, where their texture and vibrant flavor can truly shine.
Apple Cider Vinegar Pickles: Your Questions Answered (FAQ)
Why do my pickles taste bitter?
How long do apple cider vinegar pickles last?
Can I use other vegetables?
Is fermentation involved in this recipe?
What’s the difference between pickling and canning?
Classic Apple Cider Vinegar Pickles
- Total Time: 30 minutes
- Yield: 2-3 pint jars (approx. 1.5 lbs cucumbers)
Description
Unlock the secret to delicious pickles with apple cider vinegar! This step-by-step guide will show you how to use apple cider vinegar in pickles for the best flavor and crunch.
Ingredients
- 1.5 lbs pickling cucumbers (Kirby or Persian), washed and trimmed
- 2 cups apple cider vinegar (unpasteurized, with the mother, preferred)
- 2 cups filtered water
- 2 tablespoons pickling salt (canning salt)
- 1–2 tablespoons granulated sugar (adjust to taste)
- 4–6 cloves garlic, peeled and smashed
- 4–6 sprigs fresh dill or 2 dill heads
- 2 teaspoons mustard seeds (yellow or brown)
- 1 teaspoon black peppercorns
- 1/2 teaspoon dill seeds (optional)
- Optional: red pepper flakes for heat, 1/4 tsp turmeric for color
Instructions
- 1. Prepare Cucumbers: Wash cucumbers, trim ends (especially the blossom end). Slice into spears or rounds, or leave small cukes whole.
- 2. Sterilize Jars: Wash and sterilize 2-3 pint jars and lids in boiling water for 10 minutes. Keep hot until ready for filling.
- 3. Make Brine: In a saucepan, combine apple cider vinegar, water, pickling salt, and sugar. Bring to a rolling boil, stirring until salt and sugar dissolve. Remove from heat.
- 4. Pack Jars: To each hot sterilized jar, add 2-3 garlic cloves, 2 sprigs of dill, 1 tsp mustard seeds, 1/2 tsp peppercorns, and any other desired spices. Pack cucumbers tightly into jars, leaving 1/2 inch headspace.
- 5. Pour Brine: Carefully pour hot brine over cucumbers, ensuring they are fully submerged. Tap jars to release air bubbles, topping with more brine if needed.
- 6. Seal & Cool: Wipe jar rims clean. Center lids and screw on bands finger-tight. Allow jars to cool completely at room temperature.
- 7. Refrigerate: Once cool, place jars in the refrigerator. For best flavor, wait 2-3 days before enjoying. These are refrigerator pickles and last 2-3 months.
- (Optional – For Canning): If canning, process filled and sealed jars in a boiling water bath canner for 10-15 minutes (adjust for altitude). Turn off heat, remove lid, let sit 5 mins. Remove jars and cool on a towel for 12-24 hours. Check seals before storing.
- Prep Time: 20 minutes
- Cook Time: 10 minutes (for brine)